Imagine stepping into a time machine, not to revisit ancient history, but your own past. Specifically, your homebrewing past. For many enthusiasts, the journey into crafting their own beer is a winding road filled with experiments, upgrades, and a few regrettable decisions. As the narrator of the video above recounts his own nine-year brewing odyssey, a clear picture emerges of the evolution of equipment, techniques, and the pursuit of value in the homebrew world. It’s a journey from glass carboys to sophisticated electric systems, highlighting what truly matters when choosing a homebrew system.
The allure of making beer at home is undeniable. It promises creative freedom, a deeper connection to what you consume, and potentially, cost savings. Yet, as our seasoned brewer points out, the reality often hits different. Homebrewing demands patience, significant space, and a financial investment that can quickly escalate. Many newcomers are swayed by gimmicky products or overwhelmed by choices, leading to frustrating initial experiences. In contrast to instantly gratifying hobbies, brewing is a long game, much like tending a garden where the fruits of your labor aren’t immediate. A bad first batch can easily lead to giving up entirely.
Navigating the Early Days: Extract Brewing and Fermenter Choices
The narrator’s journey began on January 10th, 2015, with a modest $200 extract kit. This is a common starting point for many, offering a simplified introduction to the brewing process. Extract brewing involves using malt extract (syrup or dry) instead of mashing grains, significantly reducing complexity and time. While it’s an accessible entry, some purists might argue it offers less control over the final product’s nuances compared to all-grain methods.
A contentious point from the early days, vividly expressed in the video, is the use of glass fermenters. Glass carboys, while traditionally popular for their non-porous surface and visual appeal, present several drawbacks. They are heavy, fragile, and dangerous if dropped, risking serious injury from shards and a sticky mess. Cleaning can be a challenge, requiring specialized brushes to reach every corner effectively. However, for those who’ve used them for decades or are aging specific brews like mead, their tried-and-true nature might outweigh the risks. In contrast, modern plastic fermenters (like PET carboys or sturdy buckets) offer lighter weight, durability, and often wider openings for easier cleaning and dry hopping, making them a safer and more practical choice for most homebrewers today.
The DIY Dilemma: When to Build, When to Buy Your Brewing Setup
As brewers gain experience, the urge to customize and build their own equipment often arises. The DIY (Do It Yourself) spirit is strong in homebrewing, driven by the desire to save money and tailor a system to specific needs. But as the narrator wisely advises, true DIY saves both time and money. Wasting six hours on a Saturday to save $25 simply isn’t efficient or enjoyable for most. This perspective is crucial for aspiring builders.
Certain items lend themselves exceptionally well to DIY. Building a kegerator, for instance, can significantly reduce costs compared to buying a pre-built unit, allowing for customization of taps and internal layout. Simple mash tuns can be constructed from insulated coolers with minimal modifications. However, complex projects involving welding or intricate electrical components often exceed the average homebrewer’s skill set, leading to potential safety hazards or suboptimal performance. Imagine if you spent countless hours building a complex brew stand, only for it to fail halfway through a brew day; the frustration would outweigh any cost savings. When considering DIY for your homebrew system, assess your skills honestly and prioritize safety and functionality over extreme frugality.
Transitioning to All-Grain and Embracing Electric Brewing Systems
The progression from extract to all-grain brewing marks a significant step for many. All-grain brewing offers complete control over the malt bill, allowing for a wider range of beer styles and a deeper understanding of the brewing process. Early all-grain setups often involved DIY mash tuns and manual vorlaufing – a process of recirculating wort to clarify it before transferring to the boil kettle. This manual labor, while rewarding, can be incredibly time-consuming and physically demanding, especially as batch sizes increase.
The rise of electric brewing systems, particularly around the “kettle sour era” of 2018, revolutionized how many homebrewers approached all-grain brewing. These systems typically integrate heating elements, pumps, and temperature controllers into a single vessel, streamlining the brew-in-a-bag (BIAB) method. Initially, the narrator expressed skepticism, having broken an early electric system. The thought of investing $1,000 or more in equipment that seemed fragile was a deterrent. Yet, the convenience, precision, and ability to brew indoors offered by these systems eventually proved too compelling to ignore, especially during periods like COVID when brewing became a more frequent activity.
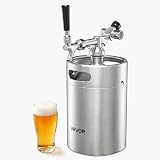
The narrator’s eventual adoption of a Clawhammer 10-gallon 120-volt system highlights the advancements in electric brewing. Modern designs, like Clawhammer’s, often prioritize robust construction and smart component placement, keeping delicate electronics away from the hot wort. This “brew in a bag, single vessel” approach simplifies the entire process: mashing, sparging, and boiling all happen in one vessel, reducing equipment needs, cleanup time, and physical exertion. The integrated recirculation pumps in quality electric systems provide superior control and efficiency compared to manual methods, ensuring consistent wort clarity and extraction.
The Quest for Efficiency: Wort Chilling and Fermentation Excellence
Rapidly chilling wort after the boil is critical for preventing off-flavors (like DMS) and ensuring a clean fermentation. Traditional methods, such as immersion chillers or ice baths, work but can be slow and consume large amounts of water or ice. The narrator’s strong preference for plate chillers underscores a significant shift in homebrewing efficiency.
Plate chillers are incredibly efficient heat exchangers. Wort flows through one set of channels, while cold water flows in the opposite direction through an adjacent set, rapidly dropping the wort’s temperature. A clever trick mentioned in the video involves using a small underwater pump. Initially, ground water is circulated through the plate chiller to quickly cool the wort to a certain point. Once the ground water’s cooling capacity is maximized, ice water is introduced, allowing the brewer to knock out the wort to pitching temperatures (around 60°F) in mere minutes. This method is far superior to older techniques, saving time, conserving water, and improving beer quality by minimizing the hot side aeration and potential for bacterial growth during a prolonged cooling phase. Imagine the difference: waiting 30-60 minutes for wort to chill versus 5-10 minutes with a refined plate chiller setup; the time savings are substantial.
As a brewer ages, or simply becomes more discerning, the importance of preserving beer quality becomes paramount. The narrator, approaching 40, emphasizes this shift: “It takes longer to drink beer. So I need to have everything preserved better.” This leads directly to the evolution in fermentation vessels. Moving from open buckets or even glass carboys to closed keg fermenters with features like floating dip tubes and spunding valves represents the pinnacle of homebrew preservation.
Fermenting in a keg significantly reduces exposure to oxygen, a primary enemy of beer stability and flavor. The floating dip tube ensures that only clear beer is drawn from the top, leaving yeast and trub behind. A spunding valve allows for precise control of fermentation pressure, which can influence yeast health, ester production, and carbonation levels. This combination ensures that the beer sees minimal oxygen until it’s poured into a glass, preventing oxidation and extending its shelf life. The ease of cleaning and the ability to carbonate directly in the fermenter further enhance the value of such a homebrew system.
The True Value of a Homebrew System: Beyond the Brand
The narrator concludes with a vital lesson: the true value of a homebrew system lies not in its branding or marketing hype, but in its reliable performance for the price. This pragmatic approach is crucial, especially when faced with the dizzying array of equipment on the market, some of which feature unnecessary bells and whistles. A $700 five-gallon fermenter, for instance, might offer premium features, but for many homebrewers, a more modest, functional option will suffice.
When evaluating a new brewing setup, consider factors like durability, ease of use, cleaning, and the overall quality of components. Does the system offer features that genuinely improve your brewing process, or are they merely aesthetic? For instance, a robust 10-gallon 120-volt system like the Clawhammer, priced around $1,000, offers significant value if it provides consistent results, reliability, and streamlines your process. However, if a comparable system costs $500 more without a clear, justifiable increase in performance or longevity, it might not be the best investment. The goal is to find that “Japanese 2.4 liter engine”—a piece of equipment known for its reliability and efficiency, regardless of flashy branding. The search for the right homebrew system is ultimately about finding the tools that enable you to consistently brew great beer, efficiently and safely, for years to come.
Brewing Up Answers to Your Homebrew System Buying Questions
What is a good way for beginners to start homebrewing?
Beginners often start with an “extract kit.” This method uses malt extract, simplifying the brewing process and making it an accessible introduction to making beer at home.
What kind of fermenter should a beginner consider?
Modern plastic fermenters, like PET carboys or sturdy buckets, are generally recommended for beginners. They are lighter, more durable, and easier to clean than traditional glass carboys.
What are some common difficulties for new homebrewers?
Homebrewing requires patience, dedicated space, and a financial investment. New brewers might also get discouraged if their first batches don’t turn out well.
Why is it important to cool the wort quickly after boiling?
Rapidly chilling the wort after boiling prevents the formation of off-flavors and ensures a clean fermentation. This quick cooling helps improve the overall quality of your homemade beer.