Demystifying Home Brewing: Your Guide to the Coopers DIY Beer Kit
Embarking on the journey of home beer brewing can seem like a complex endeavor, fraught with intimidating equipment, intricate recipes, and the specter of spoiled batches. Many aspiring brewers feel overwhelmed before they even begin, picturing elaborate setups and scientific precision beyond their reach. However, as demonstrated in the insightful video above, making your own delicious beer at home is significantly more accessible than you might imagine, especially with an all-inclusive solution like the Coopers DIY Beer Kit. This comprehensive starter kit strips away the complexity, providing everything you need to transform simple ingredients into satisfying craft beer, making it an ideal entry point for beginners and a reliable system for anyone seeking an easy brewing experience.
The beauty of the Coopers DIY kit lies in its thoughtful curation, eliminating the guesswork and initial procurement challenges often associated with new hobbies. From fermentation to bottling, the kit ensures you have the core tools and ingredients at your fingertips, allowing you to focus on the enjoyable process itself. This guide will expand on the video’s essential steps and insights, delving deeper into the ‘why’ behind each action and offering additional tips to ensure your first few batches are not just successful, but truly enjoyable. Understanding the fundamentals laid out here will empower you to brew with confidence and savor the unique satisfaction of pouring a glass of beer you crafted yourself.
Unpacking Your Coopers DIY Beer Kit: Essential Components for Making Beer at Home
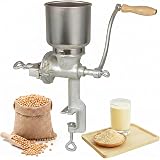
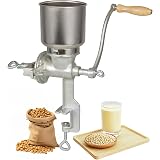
The moment you open your Coopers DIY Beer Kit, you’re greeted with a treasure trove of equipment designed to streamline your brewing process. Every item serves a specific, crucial function, making the journey from raw ingredients to ready-to-drink beer straightforward and enjoyable. The core of your setup is the robust fermenter, often accompanied by a krausen collar—a clever addition that helps manage the foam generated during fermentation, keeping your brewing area cleaner. This primary vessel is where the magic happens, transforming sugary wort into alcoholic beer over a period of weeks.
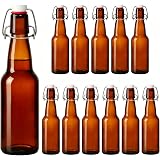
Beyond the fermenter, the kit includes vital components like a spigot and bottle filler, ensuring smooth transfer of your finished beer into bottles without unnecessary mess or oxidation. Thirty 740 ml reusable beer bottles are provided, enough to accommodate a full 23-liter batch, along with bottle caps and a capper to seal your creations securely. For accurate temperature monitoring, a stick-on strip thermometer is included, an essential tool for maintaining optimal fermentation conditions. A large mixing spoon facilitates thorough stirring, while the hydrometer and test jar offer a peek into the scientific side of brewing, allowing you to track fermentation progress and calculate your beer’s alcohol content.
Crucially, the kit comes with the primary ingredients for your first batch: a Coopers Lager beer kit and a brew enhancer. The lager kit provides the base malt extract, while the brew enhancer, typically a blend of dextrose, dry malt extract, and maltodextrin, boosts the fermentable sugars, contributing to a fuller body and higher alcohol percentage. To achieve carbonation directly in the bottle, a pack of Cooper’s carbonation drops simplifies the final stage, eliminating the need for separate priming sugar calculations. This comprehensive collection truly covers all bases, laying a solid foundation for your home brewing adventure, making the initial setup for making beer at home incredibly efficient.
The Golden Rule of Home Brewing: Sanitation is Paramount
Before any ingredients touch your brewing equipment, an unwavering commitment to cleaning and sanitizing is absolutely essential. This step cannot be overstated; it is the single most critical factor in preventing off-flavors or complete spoilage of your batch, especially when using a Coopers DIY beer kit. Yeast, while powerful, is sensitive, and unwanted bacteria or wild yeasts can easily outcompete your brewing yeast, leading to sour, unpalatable, or even undrinkable beer. Think of it as preparing a sterile environment for your delicate brew to thrive, much like a chef meticulously cleans their workspace before preparing a gourmet meal.
While the Coopers kit provides the initial setup, remember that cleaning and sanitizing supplies are separate purchases crucial for subsequent batches. Products like Diversol, often recognized by its distinctive pink color, are excellent for deep cleaning fermenters and bottles, effectively removing stubborn residues. After a thorough cleaning and rinsing to eliminate any cleaner residue, a no-rinse sanitizer such as Star San becomes your best friend. This type of sanitizer requires no rinsing after application, allowing you to simply drain the solution and proceed with brewing, leaving behind a clean, film-free, and most importantly, sanitized surface. Adopting rigorous sanitation practices from the outset will safeguard your efforts and consistently yield delicious, high-quality homebrewed beer.
The Step-by-Step Brewing Process: Crafting Your First Coopers Batch
With your equipment clean and sanitized, you’re ready to dive into the hands-on process of making beer at home. The journey begins by preparing your water and essential ingredients. Heat approximately 4-5 liters of clean, chlorine-free water to a boil, then turn off the heat and allow it to cool slightly. Chlorine in tap water can react with the beer to create unpleasant medicinal or plastic-like off-flavors, so filtering your tap water or using store-bought RO water, as suggested in the video, is a wise precaution. While the water heats, a useful trick is to place your Coopers brew can in a sink of hot tap water for about 30 minutes; this significantly thins the thick malt extract, making it easier to pour and mix thoroughly into your fermenter.
Once your hot water has cooled slightly and the brew can is warmed, transfer the 5 liters of hot water into your sanitized fermenter. Stir in the brew enhancer completely, ensuring no clumps remain at the bottom. This enhancer, a blend of dextrose and dry malt extract, is crucial for achieving a balanced flavor profile and the target alcohol percentage; without it, your beer might only reach a modest 2-3% ABV. Next, carefully open the warmed brew can and pour its contents into the fermenter, using a clean, sanitized spatula or a bit more hot water to rinse out any remaining extract. Stir the mixture vigorously until all ingredients are fully dissolved and integrated, forming what is now known as your wort.
Achieving the Perfect Volume and Gravity for Your Home Brew
After thoroughly mixing your initial ingredients, it’s time to adjust the volume and temperature of your wort to optimal levels for fermentation. First, affix the provided stick-on thermometer to the lower portion of your fermenter, giving you an accurate reading of the liquid’s temperature. Then, proceed to top up your fermenter with additional clean, cold water until you reach the 23-liter mark, which is the standard volume for a Coopers kit batch. As you add water, monitor the thermometer; your goal is to have the wort settle between 20-22 degrees Celsius (68-72 degrees Fahrenheit), an ideal range for the yeast provided with the kit.
Once the correct volume and temperature are achieved, give the entire mixture one final, vigorous stir to ensure everything is homogenous. This is also the point to take your initial hydrometer reading, known as the original gravity (OG). Carefully draw a sample of the wort into the test jar and float the hydrometer, noting the reading. The video indicates an expected OG around 1.040 to 1.042 for a standard Coopers lager kit, which should yield approximately a 4% alcohol by volume (ABV) beer. Record this number accurately, as it will be crucial for calculating your final ABV after fermentation is complete. Should you desire a stronger beer, you could reduce the final water volume to 19-20 liters or incorporate additional dextrose or dry malt extract during the initial mixing stage, though always with an eye toward balancing the flavor profile.
Pitching Your Yeast and Monitoring Fermentation
With your wort prepared and at the ideal temperature, the next step is to introduce the star of the show: the yeast. Yeast is a living microorganism responsible for converting the sugars in your wort into alcohol and carbon dioxide, a process known as fermentation. The Coopers kit typically includes a packet of generic Coopers ale yeast, which is perfectly capable of producing good beer. However, as the video notes, upgrading your yeast strain can significantly enhance the flavor profile and overall quality of your brew, even without major recipe changes. For instance, Safale US-05 is a popular choice for its clean fermentation and versatility across many ale styles, while S-04 is often favored for darker, maltier beers due to its ester profile. Nottingham is another excellent all-rounder, known for producing robust and neutral flavors.
To pitch the yeast, simply sprinkle the entire contents of the packet evenly over the surface of the wort in the fermenter. Resist the urge to stir it in, as disturbing the yeast too much at this stage can stress it. The yeast will hydrate naturally and begin its work within a few hours. Once the yeast is pitched, securely attach the lid to your fermenter, ensuring an airtight seal, and then insert the airlock. The airlock allows carbon dioxide to escape without letting unwanted air or contaminants in, creating a safe, sterile environment for your fermentation. Place your fermenter in a cool, dark place, away from direct sunlight, where the temperature remains stable between 18-22 degrees Celsius (64-72 degrees Fahrenheit). Consistent temperature control is vital to prevent off-flavors; too hot and the yeast can produce undesirable esters, too cold and fermentation may stall.
Allow the beer to ferment for approximately two weeks. During this period, you’ll observe activity in the airlock, indicating CO2 production, and a krausen (a thick layer of foam) forming on the surface of the wort. As fermentation slows, the krausen will subside, and the airlock activity will diminish. While it’s tempting to peek, avoid opening the fermenter lid unless absolutely necessary to minimize the risk of contamination. After two weeks, you can take a final hydrometer reading to confirm fermentation is complete. A stable reading over a few days, typically around 1.008 to 1.010, indicates that most of the fermentable sugars have been consumed, and your beer is ready for bottling. Now that you’ve mastered this critical phase, the next step is bottling, ensuring the beer you’ve worked so hard on is perfectly preserved and carbonated.
Bottling Your Homebrew: Achieving Perfect Carbonation
Bottling is the final step in the brewing process before conditioning, transforming your still, uncarbonated beer into a sparkling beverage ready for enjoyment. This stage requires careful attention to detail, particularly regarding sanitation and carbonation. The Coopers DIY beer kit simplifies this considerably with its convenient carbonation drops, eliminating the need for complex calculations involving priming sugar. For the provided 740 ml bottles, the recommendation is to use two carbonation drops per bottle, ensuring a consistent level of fizziness. If you choose to use smaller bottles, adjust accordingly: one drop for a 355 ml bottle and about one and a half for a 500 ml bottle. These drops are designed to provide the perfect amount of sugar for the remaining yeast to consume, creating CO2 within the sealed bottle.
Before bottling, ensure all your bottles, caps, and the bottle filler are meticulously cleaned and sanitized. Attach the bottle filler to the fermenter’s spigot, ensuring a secure connection. To fill a bottle, gently push the bottle filler to the bottom of the bottle. The filler has a small tongue that, when pressed against the bottle’s bottom, allows beer to flow. Fill each bottle to the very top, as removing the filler will displace a small amount of liquid, leaving the perfect headspace for carbonation. Once filled, quickly remove the filler, place a carbonation drop (or two) into the bottle, and immediately cap it using your capper, ensuring a tight seal. A loose cap will allow precious CO2 to escape, resulting in flat beer.
After bottling, store your capped bottles in a warm place, ideally around 18 degrees Celsius (64 degrees Fahrenheit) or slightly higher, for at least two weeks. This warm environment encourages the remaining yeast to consume the sugar in the carbonation drops, producing the CO2 necessary for natural carbonation. This period is often referred to as ‘bottle conditioning.’ While two weeks is a good general guideline, some beers, particularly those with higher alcohol content or specific yeast strains, may benefit from longer conditioning times. Once properly conditioned, chill your bottles thoroughly, and your delicious, self-made beer is ready to be enjoyed. The satisfaction of pouring a perfectly carbonated pint of your own Coopers DIY beer kit brew is an experience every home brewer cherishes.
Your Coopers DIY Beer Brewing Q&A
What is the Coopers DIY Beer Kit?
The Coopers DIY Beer Kit is an all-inclusive starter kit designed to help beginners easily make their own beer at home. It provides most of the equipment and ingredients for your first brewing experience.
What essential items are included in the Coopers DIY Beer Kit?
The kit typically includes a fermenter, reusable bottles, bottle caps and a capper, a thermometer, a hydrometer, and the basic ingredients like a Coopers Lager beer kit and brew enhancer.
What is the most important step in home brewing, especially for beginners?
Sanitation is the most critical step in home brewing. Thoroughly cleaning and sanitizing all your equipment is essential to prevent unwanted bacteria from spoiling your beer.
How long does it take for the beer to ferment?
After you’ve prepared your wort and pitched the yeast, the beer will typically ferment for approximately two weeks inside the fermenter.
How do I make my homebrewed beer fizzy after fermentation?
To make your beer fizzy, you add carbonation drops to each bottle before capping them. The bottles then need to be stored in a warm place for at least two weeks for natural carbonation to occur.