Embarking on the journey of homebrewing can be a rewarding experience. Many enthusiasts enjoy crafting their own beverages. The video above provides an excellent, easy-to-follow guide. It covers the initial steps for brewing a delicious German Pilsner beer. This classic style is known for its crispness. It often features a pleasant hop aroma. Our guide expands on those foundations. It offers deeper insights for beginner brewers.
Homebrewing allows for creative control. It also saves money in the long run. Making your own beer is a fun hobby. This particular process utilizes a convenient beer kit. Kit brewing simplifies many steps. It is perfect for those new to the craft. Follow these instructions carefully. You will be enjoying your homemade German Pilsner soon.
Understanding Your German Pilsner Beer Kit
The first step involves knowing your brewing ingredients. A good beer kit makes this simple. Our kit came from Home Brew Online in the UK. It was specially designed for an easy homebrewing experience. Inside the box, key components are found. There is a detailed instruction manual. A packet of 6 grams of dry yeast is included. This yeast will start fermentation.
Two bottles of hop oil or hop extract are present. These add distinctive flavor and aroma. Hops are crucial for a Pilsner’s character. Also, two large cans of malt extract are found. This sticky substance provides the sugars. Yeast consumes these sugars. Alcohol and carbon dioxide are then produced. No additional dextrose or brewing sugar is needed for this recipe. Only water must be supplied by the brewer.
Essential Equipment for Homebrewing Success
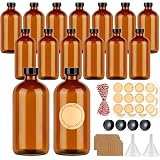
Basic equipment is required for brewing. It does not need to be fancy. A fermenter is key, holding about 23 liters. This vessel keeps your beer safe. An airlock seals the fermenter. It allows gas to escape. A plastic spigot is often attached. This makes bottling much easier. An automatic bottle filler can connect to it. This tool speeds up the bottling process.
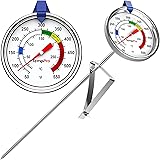
Other small items are important. A measuring cup helps with precision. A long spoon is used for mixing ingredients. A hydrometer is vital for monitoring. It measures sugar content in the wort. A stick-on thermometer is very handy. It shows the liquid’s temperature. With these few items, your brewing adventure can begin. You are well-prepared for the brewing process.
The Golden Rule: Sanitation in Homebrewing
Sanitation is perhaps the most critical step. It prevents unwanted flavors. Imagine a clean kitchen for baking. Your brewing area needs similar care. All equipment touching the beer must be sanitized. This includes the fermenter itself. The spoon and airlock also need treatment. Even the hydrometer requires sanitizing.
A solution like Star San is commonly used. It kills bacteria and wild yeast. These can spoil your beer batch. Always follow the sanitizer’s instructions. A clean surface ensures a clean brew. Skipping this step risks ruining your efforts. Your efforts in sanitation protect your beer’s quality. This practice safeguards your investment of time and ingredients.
Preparing the Malt Extract for Brewing
After cleaning, prepare the malt extract. The thick, syrupy extract needs softening. This helps it pour more easily. Place the sealed plastic containers in hot tap water. A kitchen sink works well for this. A large plastic box is also suitable. Warm water makes the extract less viscous. It becomes like warm honey. This process takes approximately 15 minutes.
Warm the extract thoroughly. It ensures all the good sugars are released. The lids can then be opened. Any protective foil must be removed. Pour the first can into the fermenter. Then add the second can. This extract is very sticky. Hot tap water is then used to rinse the cans. This ensures no valuable extract is wasted. All the sugar contributes to your Pilsner beer.
Rinsing the Extract Cans Effectively
Leftover extract can cling to the cans. This wasted sugar means less alcohol. It also means less flavor. Pour some hot tap water into each empty can. Stir the water inside the can. A spoon helps dislodge the sticky residue. The concentrated liquid should be added to the fermenter. This step ensures maximum yield. It also contributes to the final beer strength. Your German Pilsner will have its full potential.
Creating the Wort and Checking Temperature
Once all extract is in the fermenter, stir well. This dissolves the thick malt. It also starts the aeration process. Aeration adds oxygen to the liquid. Yeast needs this oxygen to multiply. It needs it for a strong start. This mixture of extract and water is called wort. It is essentially unfermented beer. The wort then gets additional water.
The total volume should reach 22.5 liters. This is roughly the 5-gallon mark. Cold tap water is typically used for this. However, direct cold water can drop the wort temperature too low. The initial wort was around 22 degrees Celsius. If tap water is very cold, say 7 degrees Celsius, continuous stirring is important. This helps distribute the temperature. The ideal fermentation range for this Pilsner is 17 to 25 degrees Celsius. Aim for a starting temperature of 18 to 20 degrees. This provides an excellent environment for the yeast.
Aerating the Wort for Healthy Yeast
Vigorous stirring during water addition is important. This introduces oxygen into the wort. Think of it like a human needing air. Yeast cells need oxygen to reproduce. They use it to build strong cell walls. This ensures a healthy fermentation. A well-aerated wort leads to robust yeast activity. It prevents sluggish fermentation. It also helps prevent off-flavors. Give the wort a good, strong stir.
Pitching the Yeast and Starting Fermentation
The yeast is added last. First, ensure the wort is at the right temperature. It should be between 17 and 24 degrees Celsius. Sprinkle the dry yeast directly onto the wort. It will float on top of the foam. This is called ‘pitching’ the yeast. It initiates the fermentation process. The lid is then secured onto the fermenter. The airlock is inserted into the lid.
The airlock should contain Star San solution. This prevents outside contaminants. It allows CO2 to escape. The temperature of the wort was 22 degrees Celsius. This falls perfectly within the ideal range. Fermentation will last between 4 and 7 days. Approximately 5-6 days after pitching, a gravity reading is taken. This determines the fermentation progress. A stable reading, for instance 1.010, means bottling or kegging can begin. This simple process starts your journey to a delicious German Pilsner.
Tap into Knowledge: Your UBC German Pilsner Homebrew Q&A
What is homebrewing a German Pilsner beer kit?
Homebrewing with a kit means making your own beer at home using a pre-packaged set of ingredients. This guide helps you craft an easy German Pilsner, a crisp beer known for its pleasant hop aroma.
What basic equipment do I need to start homebrewing?
You will need essential items like a fermenter (about 23 liters), an airlock, a long spoon for mixing, and a hydrometer to measure sugar content. A stick-on thermometer is also very useful for monitoring temperature.
Why is it important to sanitize my equipment when homebrewing?
Sanitation is critical to prevent unwanted bacteria or wild yeast from spoiling your beer and creating off-flavors. Any equipment that will touch your beer, including the fermenter and spoon, must be thoroughly cleaned and sanitized.
What is “wort” in the homebrewing process?
Wort is the unfermented beer, which is the mixture of malt extract (sugars) and water that you create before adding yeast. The yeast will then consume these sugars to produce alcohol and carbon dioxide during fermentation.