Crafting your own batch of homemade ginger beer can be an incredibly rewarding experience, offering a uniquely vibrant and naturally probiotic beverage that far surpasses store-bought alternatives. For those who have just watched the accompanying video, you now understand the fundamental steps involved in transforming a lively ginger bug into a sparkling, spiced elixir. This process allows for complete control over ingredients, ensuring a refreshing drink free from artificial flavors or excessive sugars.
Embarking on this fermentation journey opens up a world of flavor exploration, providing a deeper connection to the food and drinks we consume. Making ginger beer at home is a practical skill that enhances your culinary repertoire and contributes positively to gut health. Let’s delve further into the intricacies of brewing this delightful beverage, expanding upon the video’s essential insights and offering additional context for a successful brew.
Understanding the Core: Your Ginger Bug Starter
The foundation of any successful homemade ginger beer lies within the vitality of your ginger bug, which functions as a natural starter similar to a sourdough culture. This dynamic concoction of grated ginger, sugar, and water, when nurtured over several days, develops a rich population of wild yeasts and beneficial bacteria. These microscopic organisms are solely responsible for initiating the fermentation process, converting sugars into carbon dioxide and a trace amount of alcohol, ultimately infusing your brew with its characteristic fizz and complex flavor profile.
A highly active ginger bug exhibits noticeable bubbles and a distinctly yeasty aroma, signaling its readiness for brewing. Its robust activity ensures a vigorous fermentation in your ginger beer, leading to quicker carbonation and a lower risk of spoilage. Maintaining a healthy ginger bug involves regular feeding with fresh ginger and sugar, much like a cherished pet, keeping it vibrant and potent for future batches of your favorite fermented drinks.
The Art of Crafting Your Ginger Beer Base
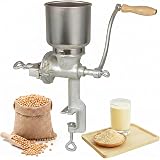
Creating the flavorful base for your ginger beer involves a precise balance of key ingredients and careful preparation, laying the groundwork for a truly exceptional beverage. As demonstrated in the video, a foundational ratio often includes 100 grams of fresh ginger and 100 grams of granulated sugar for every liter of water. This specific measurement provides an optimal balance of pungency, sweetness, and fermentable sugars, which the ginger bug later transforms.
1. **Preparation and Infusion:** Begin by thoroughly blending your peeled, chopped ginger with a portion of the water, creating a potent ginger concentrate. This step extracts maximum flavor and allows the ginger’s natural compounds to infuse effectively into the liquid. Subsequently, transfer this mixture to a pot, adding the remaining water and all the sugar, then bring it to a gentle boil to ensure the sugar fully dissolves into the solution.
2. **Spices for Complexity:** During the boiling phase, this stage presents a superb opportunity to introduce additional spices, elevating the ginger beer’s aromatic depth and character. The video highlights a selection including cinnamon, cayenne, clove, and star anise, each contributing a unique nuance to the final flavor. Consider experimenting with other spices like cardamom pods, black peppercorns, or even a hint of vanilla for customized variations.
3. **Simmering and Cooling:** Allow the spiced ginger mixture to simmer gently for approximately 10 to 15 minutes, permitting the flavors to meld and deepen harmoniously. After this crucial simmering period, remove the pot from the heat, cover it tightly, and let it cool completely to room temperature. This cooling step is paramount because introducing the live ginger bug to hot liquid would effectively kill the beneficial microorganisms, halting any potential fermentation.
Initiating Fermentation: Adding the Ginger Bug
Once your ginger beer base has cooled thoroughly, the exciting phase of active fermentation can officially begin with the introduction of your prepared ginger bug liquid. This step is pivotal as it introduces the wild yeasts and bacteria necessary to convert the sugars into the desired carbonation and probiotic qualities. The amount of ginger bug you add can influence the speed and vigor of the fermentation process, often adjusted based on the bug’s activity level.
Initially, strain the cooled ginger base to remove all solid ginger and spice particles, leaving a clean liquid ready for inoculation. Subsequently, carefully pour in a generous amount of your active ginger bug liquid; while the exact quantity can vary, a robust starter encourages a quick and reliable fermentation. The goal is to provide ample microbial density, ensuring the fermentation proceeds efficiently and yields a wonderfully bubbly beverage.
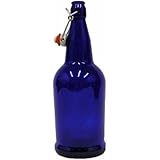
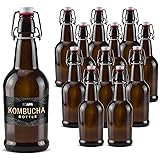
Bottling and Carbonation: Achieving the Perfect Fizz
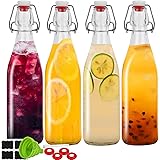
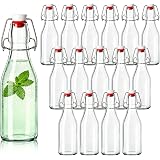
Proper bottling techniques are crucial for safely achieving optimal carbonation in your homemade ginger beer, transforming the flat liquid into a sparkling delight. Using pressure-safe bottles, such as those designed for brewing or swing-top bottles, is an absolute necessity to prevent dangerous ruptures from the accumulating carbon dioxide gas. These bottles are specifically engineered to withstand the internal pressure that builds during secondary fermentation.
Always ensure you leave a small amount of headspace at the top of each bottle, typically about an inch or two, to accommodate the gas expansion safely. This crucial step provides room for the carbon dioxide to accumulate without over-pressurizing the bottle, mitigating potential hazards. Allowing the bottled ginger beer to sit at room temperature for approximately one week facilitates the necessary secondary fermentation, although this period can be adjusted based on personal carbonation preferences and ambient temperature conditions.
To further enhance safety and enjoyment, chilling the bottles thoroughly in the refrigerator for at least 24 hours before opening is highly recommended. This significant temperature drop slows down the yeast activity and dissolves more carbon dioxide into the liquid, effectively reducing the risk of a messy foam-over. Always exercise caution when handling any fermented beverages under pressure, ensuring a safe and satisfying experience with your homemade ginger beer.
Ginger Beer Bug: Your Brewing Questions Answered
What is a ‘ginger bug’ in homemade ginger beer?
A ginger bug is a natural starter culture, similar to sourdough, made from grated ginger, sugar, and water. It contains wild yeasts and beneficial bacteria essential for fermenting your ginger beer.
Why is a ginger bug important for making ginger beer?
The ginger bug is important because its microorganisms convert sugars into carbon dioxide, creating the fizz, and also contribute to the complex flavor of the ginger beer. It acts as the fermentation starter.
Why must the ginger beer base cool down before adding the ginger bug?
It’s crucial to let the ginger beer base cool completely to room temperature before adding the ginger bug. Introducing the live microorganisms to hot liquid would kill them, preventing any fermentation from occurring.
What kind of bottles should I use for bottling homemade ginger beer?
You must use pressure-safe bottles, such as those specifically designed for brewing or swing-top bottles. These types of bottles are engineered to safely withstand the internal pressure created by carbonation.