Many aspiring brewers begin their journey seeking cost-effective ways to enjoy craft beverages. Initial home brewing setups can be surprisingly affordable. This affordability makes home brewing an accessible hobby for many. As seen in the accompanying video, understanding the right equipment for each brewing stage is crucial. We will delve deeper into the essential gear. This guide covers basic kits to advanced all-grain systems.
Starting Your Home Brewing Journey: Essential Beginner Equipment
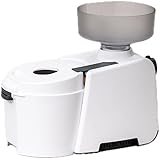
Embarking on the home brewing adventure begins with fundamental tools. The video highlights several core items. These ensure a successful first batch. A primary fermenter is paramount. This vessel acts as the beer’s first home. Cleanliness is also critical. Utilizing a dedicated cleaner, like PBW or Diversol, removes residues. Subsequently, a no-rinse sanitizer, such as Star San or Iodophor, eliminates harmful microbes. Proper sanitation prevents off-flavors. It safeguards your beer’s quality.
After fermentation, bottling requires specific items. A simple bottling wand, as demonstrated, offers an economical solution. It allows direct bottling from a spigot-equipped fermenter. Alternatively, Coopers Carbonation Drops simplify carbonation. These drops add sugar directly to each bottle. This avoids disturbing sediment in the fermenter. This method streamlines the bottling process. It prevents unwanted haze in your finished product.
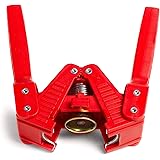
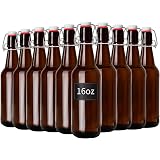
Choosing your bottling vessel is next. Both plastic and glass bottles are viable options. Food-grade plastic bottles are designed for this purpose. They do not impart off-flavors. They feature twist-on caps. Glass bottles require a capper. This tool securely seals the caps. Both options ensure your beer carbonates safely. They protect it until ready for enjoyment. Finally, a basic beer kit, like Festa or Coopers, provides all ingredients. You just need clean water and sometimes extra dextrose.
Transitioning to Intermediate Brewing: Partial Grain Methods
As your skills grow, intermediate brewing offers new challenges. Partial grain brewing expands your ingredient options. It uses much of your existing basic equipment. The core fermenter, bottles, and sanitation supplies remain essential. However, one key addition is required. A five-gallon (approximately 19-liter) pot is necessary. This pot will accommodate larger liquid volumes. A stovetop heat source is typically sufficient. It allows for controlled heating.
The process involves steeping specialty grains. These grains infuse complex flavors. They contribute to the beer’s color and aroma. Steeping them in a mesh bag is common. This prevents grain particulate from entering the wort. After steeping, malt extract is added. This can be liquid or dry. The mixture then undergoes a boil. Hops are introduced during the boil. This imparts bitterness, flavor, and aroma. Cooling the wort rapidly is vital. An ice bath in a kitchen sink works well for this. This method prevents unwanted bacterial growth. It ensures a clean fermentation. After cooling, the wort transfers to the fermenter. It is then topped up with water. Fermentation and bottling proceed as with basic kits.
Embracing All-Grain Brewing: Brew In A Bag (BIAB)
All-grain brewing represents the next step for enthusiasts. Brew In A Bag (BIAB) offers a simplified approach. It uses fewer vessels than traditional methods. A large brewing kettle is essential here. For a five-gallon (19-liter) batch, a 10-gallon (38-liter) pot is recommended. This provides ample space for mashing grains. It eliminates the need for sparging in a separate vessel. A specialized nylon bag lines the pot. This bag holds all the crushed grains. The mash water is heated to target temperature. Then, grains are added to the bag. The mash then rests for about an hour. Insulation helps maintain a consistent temperature. A blanket can be used, ensuring it is away from direct heat sources.
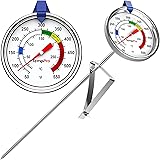
Boiling a large volume of wort requires a robust heat source. A standard stovetop is often inadequate. A powerful propane burner, such as the Kab4 model, becomes indispensable. This burner quickly brings the wort to a rolling boil. After mashing, the grain bag is lifted. The wort drains into the kettle. Squeezing the bag is often debated. Many brewers find it harmless. It can increase wort yield. During the boil, hops are added according to the recipe. Additionally, Whirlfloc tablets clarify the beer. Yeast nutrient aids a healthy fermentation. These inexpensive additions significantly enhance beer quality. Rapid cooling after the boil is critical. An immersion chiller is highly recommended. It cools the wort to pitching temperatures in 15-20 minutes. The efficiency of cooling depends on local groundwater temperatures. This quick cooling minimizes off-flavors. It prepares the wort for yeast inoculation.
Exploring Traditional All-Grain: The Three-Vessel System
Historically, the three-vessel system was a cornerstone of all-grain brewing. This setup, while comprehensive, can appear daunting initially. It requires a Hot Liquor Tank (HLT), a Mash Tun, and a Boil Kettle. The HLT heats all mash and sparge water. This ensures precise temperature control. The Mash Tun is often a converted cooler. A ball valve replaces the plastic spigot. Inside, a bazooka screen or false bottom prevents grain passage. This setup ensures clear wort collection. After mashing, wort transfers to the Boil Kettle. This process typically uses gravity or pumps. Gravity feeding is simpler. Pumps offer more control over transfer speeds.
Sparging is a key step in this system. Fly sparging involves slowly rinsing the grain bed. Sparge water flows from the HLT. It trickles over the grains. Wort simultaneously drains into the boil kettle. Brewers try to match flow rates. This maximizes sugar extraction. Batch sparging offers a simpler alternative. After the initial mash, water is simply poured over the grains. This method is generally faster. It requires less precise management. Once sparging is complete, the boil proceeds. Hops are added as per the recipe. Cooling is performed with an immersion or counterflow chiller. This traditional method allows for very large batch sizes. It is suitable for those seeking extensive control. While once dominant, newer systems offer streamlined alternatives.
Modern All-Grain Brewing: Electric All-In-One Systems
Contemporary homebrewers increasingly favor electric all-in-one systems. Units like the BrewZilla and Grainfather integrate multiple functions. They combine mashing, boiling, and chilling. These systems are incredibly versatile. They can be used almost anywhere with a power outlet. A built-in control panel manages temperatures. It activates pumps and sets boil parameters. This level of automation simplifies the brewing process significantly. A recirculation arm is a key feature. It continuously pumps wort over the grain bed. This achieves excellent mash efficiency. Many users report 75-80% efficiency. This results in more fermentable sugars from the grains.
These units feature an internal grain basket. This basket holds the crushed grains. It sits within the main boiler. After mashing, the basket is lifted. It allows the wort to drain into the boiler. Sparging is typically done by pouring heated water over the lifted grain basket. This rinses remaining sugars into the wort. Subsequently, the wort is brought to a boil. Hops are added during the boil stage. All-in-one systems often include an integrated chiller. The Grainfather, for example, features a counterflow chiller. This efficiently cools the wort. Once chilled, the wort transfers to a fermenter. These systems represent a convenient solution. They offer precision and ease of use. They are ideal for brewers seeking efficiency and automation. This range of home brewing equipment truly caters to every level.
Hoppy to Help: Your Homebrewing Q&A
Is home brewing an expensive hobby to start?
No, initial home brewing setups can be surprisingly affordable, making it an accessible hobby for many. You can begin with a basic kit that doesn’t require a large investment.
What are the most important things I need for my very first batch of homebrewed beer?
For your first batch, you’ll need a primary fermenter, a dedicated cleaner (like PBW), a no-rinse sanitizer (like Star San), and a basic beer kit. These are essential for a successful start.
Why do I need to clean and sanitize everything when making beer?
Cleanliness is critical in homebrewing to prevent off-flavors and protect your beer’s quality. Sanitization eliminates harmful microbes that could spoil your brew.
How do I put my finished homebrew into bottles?
You can use a simple bottling wand to fill bottles directly from your fermenter. To carbonate, you can add Coopers Carbonation Drops to each bottle or use a capper for glass bottles after adding priming sugar.