Have you ever dreamed of brewing your own crisp, flavorful beer but found yourself intimidated by the scale and expense typically associated with homebrewing? Many aspiring brewers are deterred by the prospect of investing in extensive, costly equipment and managing vast quantities of liquid, often ranging from 25 to 30 liters per batch. This initial hurdle, coupled with concerns about storage space and the steep learning curve, can make the journey seem daunting, especially for beginners. Fortunately, as demonstrated in the video above, crafting exceptional beer, specifically a delightful Czech-style lager, can be achieved through a simpler, more approachable method: small-batch home brewing using the efficient brew-in-a-bag (BIAB) technique. This guide will elaborate on the nuances of this process, providing a comprehensive walkthrough that expands upon the video’s essential insights.
The Undeniable Advantages of Small-Batch Home Brewing
For those new to the craft, or even seasoned brewers seeking flexibility, the small-batch approach offers a multitude of benefits that traditional large-scale setups often cannot match. Firstly, the initial financial outlay is significantly reduced. Instead of hundreds of pounds being invested upfront in specialized fermenters, larger kettles, and a comprehensive array of accessories, the entry barrier is considerably lower. This allows enthusiasts to dip their toes into the world of brewing without undue financial pressure, making experimentation far more viable.
Secondly, managing a smaller volume of liquid, typically around five liters, is inherently less overwhelming. The sheer logistics of handling and storing 25 to 30 liters of beer can be a significant deterrent. Small batches, however, fit comfortably within standard kitchen environments and require minimal dedicated storage space, eliminating the need for expansive cold rooms or multiple extra refrigerators. Thirdly, the learning curve is gentler, promoting a more relaxed environment for skill development. Mistakes, an inevitable part of any learning process, are less impactful when only five liters of wort are at stake, as opposed to potentially 30 liters of undrinkable beer. This fosters confidence and encourages further exploration of different styles and ingredients.
Finally, small-batch brewing allows for unparalleled flexibility in recipe development. Brewers can easily experiment with various malts, hops, and yeast strains without committing to a large volume of a potentially unsuccessful concoction. This approach facilitates a deeper understanding of how each ingredient influences the final product, turning every brew day into an exciting educational experience. From traditional lagers and robust ales to seasonal pumpkin ales or even unique elderflower and nettle beers, the possibilities are vast and readily accessible.
Demystifying the Brew-in-a-Bag (BIAB) Method
The brew-in-a-bag (BIAB) method is a cornerstone of accessible small-batch home brewing, streamlining the brewing process by consolidating mashing and boiling into a single vessel. This eliminates the need for a separate mash tun and sparge arm, significantly reducing both equipment requirements and cleanup time. The simplicity of BIAB is its greatest strength, making it ideal for beginners while still yielding high-quality results.
The core principle involves placing all the crushed malt in a large mesh bag, which is then steeped in hot water within the primary brewing kettle. After the mashing phase, the bag is simply lifted out, and the liquid (wort) is then brought to a boil in the same pot. This ingenious method not only simplifies the physical process but also makes temperature control more manageable for home brewers without complex PID controllers or advanced equipment. The efficiency of BIAB allows for a quicker turnaround and less fuss, allowing the brewer to focus on the craft rather than cumbersome procedures.
Essential Equipment for Your Small-Batch Brewery
As highlighted in the video, the equipment list for a small-batch Czech-style lager is surprisingly minimal, with many items likely already present in a well-stocked kitchen. Investing in a few specialized pieces will complete your setup, allowing you to embark on your brewing journey with confidence.
- Five-Liter Glass Demijohn with Bung and Airlock: This serves as your primary fermentation vessel. The demijohn’s glass construction allows for easy observation of fermentation activity, while the bung and airlock create a sealed, anaerobic environment, crucial for healthy yeast activity and preventing contamination.
- Brew Bag: A large, fine-mesh bag specifically designed for holding grain during the mash. It must be sturdy enough to withstand the weight of wet grain and the heat of the mash.
- Small Muslin Bags: These are used to contain hops during the boil, making their removal straightforward and preventing hop particles from clouding the finished beer.
- Large Stockpot (11 liters or more): An essential piece of equipment for both mashing and boiling. An 11-liter pot offers ample head-space, reducing the risk of boil-overs during the vigorous boiling phase.
- Siphon: While optional, a siphon is highly recommended for transferring wort and beer between vessels. It minimizes oxygen exposure and avoids disturbing sediment, both critical for clear, clean-tasting beer.
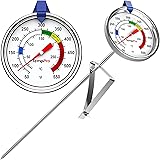
- Thermometer: Accurate temperature control is paramount in brewing. A reliable thermometer, even a standard meat thermometer, is indispensable for monitoring mash and wort temperatures.
- Funnel: Aids in transferring liquids into the narrow opening of the demijohn, minimizing spills and potential contamination.
- One Large and One Small Colander: Useful for straining and, crucially, for assisting in squeezing the brew bag to extract maximum wort.
Ensuring all equipment is meticulously cleaned and sanitized is as important as the brewing process itself. Contaminants can quickly spoil a batch, so a dedicated cleaning regimen, including the use of no-rinse sanitizers, is non-negotiable.
Crafting Your Czech-Style Lager: A Step-by-Step Guide
The journey to a refreshing Czech-style lager is a precise, yet rewarding, series of steps. Attention to detail at each stage will culminate in a superior brew.
1. Water Purification: The Unsung Hero
The quality of your water significantly impacts the flavor profile of your final beer. Chlorine and chloramines, often present in tap water, can react with yeast to produce undesirable medicinal or plastic-like off-flavors. As demonstrated, using a quality water filter like a LARQ system is highly effective in removing these contaminants. Alternatively, boiling water for 10-15 minutes or using campden tablets can also achieve chlorine reduction. Start by purifying approximately six liters of water, ensuring a clean slate for your brewing process.
2. The Mashing Phase: Extracting the Goodness
The mashing process converts complex starches in the malt into fermentable sugars, which the yeast will later consume. It’s a critical step where temperature control is key.
- Firstly, place a small colander at the bottom of your stockpot; this acts as a heat shield, potentially preventing the brew bag from scorching if directly touching the heating element.
- Next, fit your brew bag securely around the rim of the stockpot. Pour the purified six liters of water into the bag-lined pot.
- Heat the water to 75 degrees Celsius. Keeping the lid on during this heating phase minimizes evaporation, preserving your target liquid volume.
- Once 75 degrees Celsius is reached, gently add one kilogram of crushed Pilsner malt into the brew bag. Stir thoroughly to ensure there are no dry clumps and the malt is evenly hydrated. An induction cooktop, as mentioned, provides excellent temperature stability, which is highly advantageous here.
- Maintain a consistent mash temperature of 65 degrees Celsius for 60 minutes. This temperature range primarily promotes beta-amylase activity, yielding a more fermentable wort and a drier beer with a crisper finish, characteristic of a Czech-style lager.
- After the initial 60 minutes, raise the temperature to 75 degrees Celsius for an additional 20 minutes. This “mash out” step serves two crucial functions: it halts enzymatic activity, fixing the sugar profile, and it lowers the wort’s viscosity, making sparging (extracting the wort) more efficient. Crucially, do not allow the wort to boil during this stage.
3. Sparging and Boiling: Preparing the Wort
With mashing complete, the next objective is to extract the sugary wort and prepare it for boiling and hop additions.
- Carefully lift the brew bag from the pot. The grain and wort will be extremely hot, so exercise extreme caution.
- Place the brew bag into a large colander positioned over your stockpot. Gently press the bag to squeeze out as much wort as possible, maximizing your sugar extraction. The spent grain can then be composted, a sustainable practice.
- Bring the collected wort to a vigorous boil, keeping the lid on to prevent excessive evaporation.
- As the wort reaches a rolling boil, add 20 grams of Saaz hops, contained within a small muslin bag. Saaz hops are quintessential for Czech-style lager, imparting a noble, spicy, and floral aroma and bitterness. Boil for 45 minutes.
- After 45 minutes, introduce a second muslin bag containing 10 grams of Saaz hops. Continue boiling for another 15 minutes. This two-stage hop addition provides a balanced bitterness and aroma profile, with the later addition contributing more aromatic compounds. The total boil time will be 60 minutes.
4. Cooling and Fermentation: The Yeast’s Domain
Rapid cooling and proper yeast pitching are paramount for a clean fermentation and a well-defined Czech-style lager flavor.
- While the wort boils, meticulously sterilize your five-liter demijohn, bung, and airlock. A no-rinse sanitizer is highly effective and convenient for this purpose, eliminating the need for further rinsing which could introduce contaminants.
- Once the 60-minute boil is complete, carefully remove the hop bags. It is now critical to cool the wort as rapidly as possible to approximately 10 degrees Celsius. This rapid cooling, known as a “cold break,” helps to precipitate unwanted proteins and improves clarity.
- The most common method for rapid cooling is an ice bath. Fill your sink with cold water and ice, then immerse the hot pot of wort. Stirring the wort periodically accelerates heat transfer. Replace the water in the sink as it warms to maintain cooling efficiency.
- Once the wort reaches approximately 10 degrees Celsius, carefully pour it into the sterilized demijohn using a funnel to minimize spillage and oxidation.
- Pitch 5 grams (roughly half a packet) of lager yeast into the cooled wort. The precise amount may vary depending on the yeast strain, so always consult the yeast packet instructions. Pitching yeast into wort that is too warm can “shock” or even kill the yeast, leading to sluggish or off-flavor fermentations.
- Fill the airlock with water and firmly fit the bung to the demijohn. The airlock allows carbon dioxide to escape while preventing airborne contaminants from entering.
- Store the demijohn in a cool, dark place. An ideal fermentation temperature for many lager yeasts is around 10-12 degrees Celsius, though the video mentions 17-18 degrees Celsius, which would produce a “cold fermented ale” or a faster, less traditional lager profile. Consult your specific yeast packet for optimal temperature ranges to achieve the desired lager character. Expect vigorous airlock activity for the first 24-48 hours, a clear sign of active fermentation.
5. Bottle Conditioning: The Final Transformation
After six to seven days, primary fermentation will typically slow or cease, indicated by a significant reduction or complete stop in airlock activity. This signals the readiness for bottling and conditioning.
- Carefully remove the bung from the demijohn. Using a clean, sanitized siphon, transfer the beer into a clean, sanitized pot. Exercise caution to leave as much yeast sediment behind in the demijohn as possible; this sediment can impart undesirable flavors and haziness.
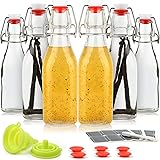
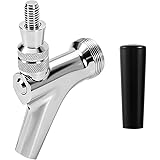
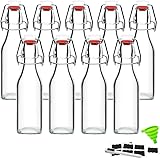
- Transfer the beer into individual bottles or a small keg. Flip-top bottles are an excellent choice for their convenience and effective seal, making them ideal for small-batch home brewing.
- Add a small pinch of priming sugar (typically 2-4 grams per 500ml bottle, but always calculate based on your volume and desired carbonation) to each bottle before sealing. This sugar provides a small amount of “food” for the residual yeast, which will then produce CO2 within the sealed bottle, carbonating your beer. This process is called bottle conditioning, giving the beer its effervescence and a satisfying ‘pop’ upon opening.
- Place the sealed bottles in the fridge for at least two weeks. This bottle conditioning period is crucial for the beer to fully carbonate, for flavors to mature and mellow, and for the beer to develop its signature clean, crisp taste. Lagers, in particular, benefit from extended cold conditioning, often referred to as “lagering.”
Post-Brew Cleanup and The Art of Documentation
Maintaining impeccable hygiene is non-negotiable in brewing. After every batch, all equipment must be thoroughly cleaned and sanitized. Residue left on demijohns, siphons, or other tools can harbor bacteria and wild yeasts, posing a significant threat to future brews. A meticulous cleanup routine ensures equipment longevity and consistent quality for your next small-batch home brewing project.
Beyond cleanliness, maintaining a detailed brewing log or journal is an invaluable practice. Documenting every step—ingredient types and quantities, exact temperatures, timings, and even tasting notes—creates a comprehensive record. This enables you to replicate successful flavor profiles with precision and provides a critical reference point for troubleshooting or adjusting recipes. Brewing, as noted, is both a science and an art, leaving ample room for creativity. Do not hesitate to experiment with hop varieties and quantities, or different yeast strains, as these elements profoundly influence the beer’s body, alcohol content, and complex flavor notes. The journey of crafting your own Czech-style lager is one of continuous learning and delicious discovery.
Small Batch Sips: Your Czech Lager Brewing Q&A
What is small-batch home brewing?
Small-batch home brewing involves making beer in smaller quantities, typically around five liters, which makes the process less intimidating and more accessible for beginners compared to large batches.
What is the Brew-in-a-Bag (BIAB) method?
BIAB is a simplified brewing technique where all the crushed malt is placed in a large mesh bag within a single stockpot for both mashing and boiling, significantly reducing equipment needs and cleanup time.
What are the advantages of small-batch brewing?
Small-batch brewing offers lower initial costs, requires less storage space, provides a gentler learning curve, and allows for greater flexibility to experiment with different recipes.
What kind of beer does this guide teach me to make?
This guide teaches you how to craft a crisp and flavorful Czech-style lager, which is known for its distinct noble hop aroma and balanced taste.
Why is it important to clean and sanitize brewing equipment?
Cleaning and sanitizing all equipment meticulously is crucial to prevent contamination from bacteria or wild yeasts, which can spoil your beer and affect its taste and quality.