Embarking on the journey of homebrewing can often appear as a formidable endeavor, frequently associated with complex scientific principles, specialized equipment, and a significant financial outlay. Nevertheless, the creation of unique, artisanal beverages from the comfort of one’s home is a rewarding pursuit that need not be overly complicated or expensive. The accompanying video expertly demonstrates how to produce a flavorful one-gallon batch of Simple Pilsner Beer, effectively demystifying the process for novice brewers.
This introductory guide specifically highlights a minimalist approach to crafting Pilsner beer, which is particularly suitable for those operating on a modest budget. The methods outlined emphasize accessibility, requiring only fundamental ingredients and readily available household items for much of the brewing process. Consequently, individuals interested in the intricacies of fermentation are provided with an actionable blueprint, enabling them to gain practical experience without substantial upfront investment. This approach allows for a gentle entry into the expansive world of homebrewing.
Essential Ingredients and Equipment for Your One-Gallon Pilsner
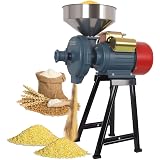
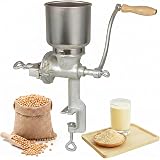
The successful production of a Simple Pilsner Beer batch is contingent upon the meticulous selection of ingredients and the appropriate preparation of equipment. For instance, the foundation of this particular brew is provided by two pounds of Belgian Pilsner malt, which has already been milled to facilitate the extraction of fermentable sugars. This choice of malt is instrumental in defining the beer’s characteristic light body and subtle flavor profile, differentiating it from darker, more robust styles. Furthermore, one ounce of Saaz hop pellets is incorporated, imparting the traditional spicy and floral aroma that is synonymous with authentic Pilsners, thereby balancing the malt’s inherent sweetness.
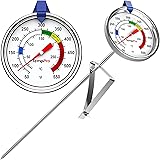
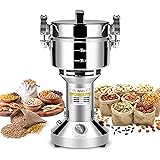
Moreover, the process necessitates one packet of Saflager S-23 dry lager yeast, a specific strain chosen for its ability to ferment at cooler temperatures, which is crucial for achieving a crisp, clean lager finish. A modest quantity of sugar, approximately one cup, serves as the priming agent later in the process, initiating secondary fermentation within the bottles to achieve desirable carbonation. In addition to these primary ingredients, various pieces of equipment are essential: one or more fine mesh straining bags for the grain, approximately one and a half gallons of quality spring water, and a large eight-quart or larger pot for the mashing and boiling stages. A fermenter, ideally equipped with a spigot and an integrated airlock, simplifies transfer and maintains anaerobic conditions. Finally, a thermometer, a siphoning hose, and several pressure-resistant flip-top bottles are required for bottling, underscoring the importance of sanitation throughout the entire operation.
The Foundational Steps: Mashing Your Pilsner Malt
The initial and perhaps most critical stage in crafting a Simple Pilsner Beer involves the mashing process, wherein the milled grain is introduced to heated water. This step is akin to steeping tea, but with a more precise temperature regimen designed to activate enzymes naturally present in the malt. It is during mashing that complex starches within the grain are converted into simpler fermentable sugars, which will subsequently be consumed by the yeast. A crucial recommendation is to fill the straining bags with the malt over a plate or basin, thereby containing any fine powder that might escape and ensuring a cleaner workspace.
Once the grain bags are securely tied, the operation shifts to the kitchen, where one and a half gallons of water are carefully heated in a large pot. The water’s temperature is carefully monitored and brought to a range of 158 to 160 degrees Fahrenheit before the malt-filled straining bags are gently submerged. The pot is then covered, and the temperature is maintained at approximately 150 degrees Fahrenheit for a total duration of 90 minutes. This sustained temperature profile is vital for maximizing the enzymatic conversion of starches, establishing the sugar content that will ultimately define the beer’s alcohol by volume. Should the temperature begin to fall during this period, the heat should be briefly turned on low to restore the ideal range, ensuring a consistent and effective mash.
Boiling and Hopping the Wort: Crafting Your Pilsner’s Character
Upon the completion of the 90-minute mashing period, the grain bags are carefully removed from the pot, allowing any residual liquid to drain back into the emerging wort. This liquid, now rich in fermentable sugars, is then brought to a vigorous boil, initiating a crucial phase that sterilizes the wort and facilitates the integration of hop flavors. During this boiling process, the lid is typically removed to allow for evaporation, which concentrates the wort and reduces its volume to approximately one gallon. This reduction is important for achieving the desired strength and body in the final product.
Continuous stirring of the boiling wort is a recommended practice, particularly because the concentrated sugars tend to settle and may scorch the bottom of the pot, similar to how spaghetti sauce can stick if neglected. The addition of Saaz hop pellets occurs during the boil, with the specific timing influencing the resulting bitterness, flavor, and aroma of the Pilsner beer. Hops added early in the boil contribute bitterness, while those added later impart aromatic qualities. Once the boiling phase concludes, the heat is turned off, and immediate cooling of the wort is initiated, preparing it for yeast pitching.
Cooling and Fermenting Your Pilsner Batch
The rapid cooling of the wort is a critical step that must be executed promptly after boiling to prevent the growth of undesirable bacteria and ensure a clean fermentation. The objective is to lower the wort’s temperature as quickly as possible to a range between 60 and 70 degrees Fahrenheit, which is optimal for the Saflager S-23 dry lager yeast. Various methods can be employed for this purpose; for example, submerging the pot in a sink filled with cold water, often referred to as an ice bath, is an effective technique. Alternatively, commercially available wort chillers or even frozen water bottles can accelerate the cooling process significantly.
Once the wort has reached the desired temperature range, it is carefully transferred into a sanitized fermenter, ensuring minimal splashing to prevent aeration, which can lead to off-flavors. Prior to pitching the yeast, a hydrometer reading is often taken to determine the original gravity (OG) of the wort; in this particular instance, an OG of 1.060 was recorded. This measurement provides a baseline for calculating the final alcohol content. Subsequently, approximately three grams of Saflager S-23 yeast, equivalent to roughly one teaspoon, are carefully sprinkled over the surface of the wort. This ensures even distribution and proper rehydration of the yeast cells, setting the stage for robust fermentation. The fermenter is then sealed with an airlock, preventing oxygen ingress while allowing fermentation gases to escape, and placed in a dark, cool location for approximately two weeks to facilitate primary fermentation.
The Art of Bottling and Carbonation for a Simple Pilsner
Following the completion of primary fermentation, typically after two weeks, the Pilsner beer is ready for bottling and secondary fermentation, a process vital for achieving natural carbonation. At this juncture, a final hydrometer reading is taken to ascertain the final gravity (FG), which, for this specific batch, measured 1.018. This reading, when compared with the original gravity, allows for the calculation of the beer’s alcoholic strength. Prior to bottling, a measured amount of priming sugar—approximately one cup for a one-gallon batch—is gently introduced into the beer. This sugar provides the yeast with a final food source to produce carbon dioxide within the sealed bottles.
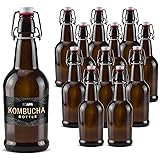
The beer is then carefully siphoned into thoroughly sanitized flip-top bottles, ensuring that as little sediment as possible is transferred. While the beer may appear cloudy at this stage, as it was not filtered, this characteristic does not diminish its quality, merely its visual clarity. The bottled beer is subsequently stored in a cool, dark place for approximately four to five days, allowing the secondary fermentation to produce the desired level of carbonation. After this conditioning period, the bottles are moved to refrigeration, which helps to further settle any remaining sediment and provides a crisp serving temperature. This careful process ensures that each bottle of Pilsner beer is ready for enjoyment, encapsulating the brewer’s effort.
Tasting and Reflecting: The Rewards of Brewing a One-Gallon Pilsner
The culmination of the brewing process, from mashing to bottling, arrives with the eagerly anticipated tasting of the homemade Pilsner beer. This final step not only celebrates the brewer’s achievement but also provides valuable insights for future batches. Upon opening, a slight release of carbonation is expected, a positive indication that the priming sugar and yeast performed their roles effectively. The aroma of the beer, often light and subtly sweet, immediately distinguishes it as a Pilsner, a style not typically characterized by a heavy body or intense flavors.
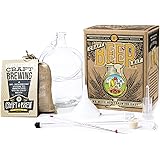
The flavor profile of a freshly brewed, simple Pilsner often exhibits a pleasant, albeit light, taste, offering a distinct departure from commercial counterparts. While the initial carbonation may sometimes be less effervescent than desired, this is a common learning point for homebrewers and can be adjusted in subsequent attempts by ensuring tighter seals or slightly modifying priming sugar amounts. Furthermore, the presence of small whitish floaties or cloudiness, a result of not filtering the beer, is generally harmless and does not detract from the flavor experience. This hands-on experience of making beer from scratch, rather than relying on kits, yields a profound sense of satisfaction and validates the effort invested, irrespective of minor imperfections. Indeed, the joy of declaring, “I made this,” far outweighs the modest cost savings of store-bought beer, making each small-batch Pilsner a uniquely personal triumph.
Fermenting Your Questions: The Simple Pilsner Q&A
What kind of beer does this guide teach me to brew?
This guide teaches you how to brew a Simple Pilsner Beer in a small, one-gallon batch. It’s designed for beginners and emphasizes a minimalist, budget-friendly approach.
Is homebrewing a Pilsner complicated or expensive for a beginner?
No, this guide aims to demystify homebrewing, showing that it doesn’t need to be overly complicated or expensive. It focuses on using fundamental ingredients and readily available household items.
What are the main ingredients needed to brew this Pilsner?
The main ingredients include Belgian Pilsner malt, Saaz hop pellets, Saflager S-23 dry lager yeast, and a small amount of sugar for carbonation. You will also need quality spring water.
What is ‘mashing’ in brewing?
Mashing is the initial and critical step where milled grain is introduced to heated water. During this process, enzymes convert complex starches within the grain into simpler fermentable sugars.